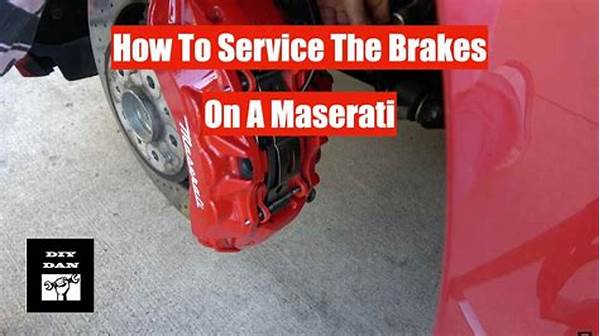
Quattroporte Brake Rotor Replacement Instructions
In the realm of luxury automobiles, maintaining the integrity and performance of your vehicle is paramount. For aficionados of the Maserati Quattroporte, ensuring the optimal function of each component is essential, particularly when it comes to the braking system. This article will provide a comprehensive set of instructions for replacing the brake rotors on your Quattroporte, a task that is critical to both safety and driving enjoyment.
Read Now : Sonata Occupant Protection Evaluations
The Basics of Quattroporte Brake Rotor Replacement Instructions
For those delving into the task of quattroporte brake rotor replacement instructions, understanding the fundamentals is akin to knowing the ABCs. Start by ensuring the car is securely lifted using a jack, resting on jack stands. Safety first, folks! With your toolkit ready, the wheels need to be removed to have a clear sight of the brake assembly. You’ll then find yourself facing the caliper that holds onto the precious rotor. Using the right-sized wrench, gently unbolt the caliper. Hold on tight—don’t let it dangle by the brake line! Slide out that old rotor. Feel free to give it a sentimental farewell or a cheeky good riddance. Now, align the new rotor, popping that bad boy into place and securing the caliper back where it belongs. Spin those lug nuts back on and presto, you’re a rotor-replacement wizard, my friend!
Breaking Down Quattroporte Brake Rotor Replacement Instructions
1. Step 1 Vibes: Get that quattroporte jacked up snug and let her rest easy on those jack stands. Safety’s the name, stability’s the game.
2. Step 2 Feels: Whip out the essentials, remove those wheels, and embrace the full view of your brake assembly like an artist with a freshly blank canvas.
3. Step 3 Groovin’: Caliper removing time! Use your trusty wrench—unscrew it, but let her dangle, not! Secure it properly.
4. Step 4 Showtime: Old rotor, pack your bags! Slide it out and usher in the new—it’s your Quattroporte’s time to shine.
5. Step 5 Wrap It Up: Wheel it all back together, tighten those lug nuts, and give yourself a pat. You’re done! Quattroporte brake rotor replacement instructions completed, my dude.
Dive Deeper into Quattroporte Brake Rotor Replacement Instructions
So, you’re down to get those quattroporte brake rotor replacement instructions under your belt? Here’s the lowdown. First, you want to get that beast up on some jack stands—none of that teeter-totter business. The next move? Yank off those wheels like you’re busting out of jail. With your sights set on the rotor, unscrew that caliper like you’re popping the cap off a cold one. Keep it steady though; you don’t want it hanging by the brake line like some kind of automotive tightrope walker.
With the caliper out of your hair, slide off the old rotor—give it a salute for its service. Slide the new one in like it just scored VIP access to the hottest party in town. Reattach the caliper, making sure everything is snug and that rotor is like a glove on a hand. Pop those wheels back on and crank those lug nuts back into position like you mean business. There you have it—quattroporte brake rotor replacement instructions accomplished like a champ!
Tips for Mastering Quattroporte Brake Rotor Replacement Instructions
1. Chill Vibe Prep: Make sure your quattroporte is stable, ’cause shaky isn’t chic when you’re hugging metal parts.
2. Jack Stance: Settle it low, give it a solid stand. Nobody likes an unsteady dude, not even cars.
3. Wheel Wooing: Take them off like you’re undressing a sports car—smooth and decisive.
Read Now : Kia K5 Touchscreen Display Functionality
4. Caliper Care: Jiggle but don’t juggle. Those bolts deserve the delicate touch of a brake guru.
5. Rotor Swap Royale: Slide the new rotor in, shimmy it into place, like you’re setting up the best scene in a movie.
6. Caliper Comeback: Securely bolt it back—nothing casual here.
7. Rewheel Romance: Get those wheels back on, amp them up to mighty tight.
8. Lug Nut Love: Tighten with vigor. You’re not playing games; it’s serious business!
9. Final Check Vibes: Once fitted, ensure everything’s aligned. No room for out-of-tune beats in this orchestra.
10. Confident Closure: Step back, admire your work. Your quattroporte’s ready to roll, thanks to your killer moves.
Quattroporte Brake Rotor Replacement Instructions Deciphered
Imagine you’re a car surgeon and your patient is the elegant Quattroporte. First, give it a good, stable hug before you get down and dirty. Next, those wheels have to go; it’s like peeling off a layer to get to the juiciest part. The moment you unclasp the caliper, boom! You’re right in the action zone, my friend. Hold that caliper steady like you’re about to cradle a newborn. With the old rotor out, there’s space for the new, much like making room for new kicks in a crowded closet. Attach everything back together, make sure it’s all singing in harmony, then finish up those lug nuts like a fencing master dotting the i’s and crossing the t’s of a perfect match. Follow these quattroporte brake rotor replacement instructions, and you’re not just fixing a car—you’re creating automotive history.
Navigating Quattroporte Brake Rotor Replacement Instructions
Bringing life back into the Quattroporte, these quattroporte brake rotor replacement instructions are your map out of the maze. You know the drill—start with elevation. Get this classy vehicle perched up proper, respecting its elegance. Jump into the wheel world; they need to release their grasp, it’s rotor time. When the caliper meets your gaze, don’t freak—it’s part of the plan. Hold it like a cherished trophy, something you won fair and square. The old rotor’s going out, kicking it to the curb, and you’re sliding the new rotor in with finesse. And that’s a wrap, torque and twist those lug nuts, secure them like they’re guarding treasure. That’s your handy work, owning those quattroporte brake rotor replacement instructions like a mechanic with seriously cool vibes.